ESP8266 ESP-12F Serial Port Module: Difference between revisions
Jump to navigation
Jump to search
No edit summary |
|||
| (45 intermediate revisions by the same user not shown) | |||
| Line 1: | Line 1: | ||
[[File:Esp8266 programmer.jpg|thumb|ESP8266 programmer]] | [[File:Esp8266 programmer.jpg|thumb|ESP8266 programmer]] | ||
[[File:NodeMCU PYFlasher.png|thumb|Flasher tool]] | [[File:NodeMCU PYFlasher.png|thumb|Flasher tool]] | ||
== Flashing the ESP8266 == | |||
# Download the NodeMCU PyFlasher [https://github.com/marcelstoer/nodemcu-pyflasher] | # Download the NodeMCU PyFlasher [https://github.com/marcelstoer/nodemcu-pyflasher] | ||
# Download the ESPlorer [https://esp8266.ru/esplorer/] | # Download the ESPlorer [https://esp8266.ru/esplorer/] | ||
# Download latest greatest NodeMCU build [https://nodemcu-build.com/stats.php] | # Download latest greatest NodeMCU build [https://nodemcu-build.com/stats.php] | ||
# Download latest build of PlatformIO [https://platformio.org/] | |||
# Download and install git [https://git-scm.com/downloads] | |||
== Software == | |||
=== How to configure the OpenHAB Homie Thing === | |||
[[File:Homie debug configuration.PNG|thumb|200px|Hardware device ID: 18fe34d75723 <span style="color:maroon"> -> device ID 18fe34d75723 </span>]] | |||
# Flash the base software to the esp8266: [https://github.com/tinel-c/HomieTest GitHub Homie test software repository] | |||
# Configure the details of the network in the data/homie/configuration.json file | |||
# Upload the configuration file to the esp: [http://docs.platformio.org/en/stable/platforms/espressif8266.html?highlight=spiffs#uploading-files-to-file-system-spiffs How to upload the files to ESP8266] | |||
# Reboot | |||
# Connect to the terminal and get the verbouse communication | |||
# Identify the device ID | |||
# Go to: [http://tinel.go.ro:8089/paperui/index.html#/configuration/things OpenHAB Configuration Things] and configure the thing using the ID above | |||
Supported channel things are listed here: [https://www.openhab.org/addons/bindings/mqtt.generic/#channel-type-string List of supported channels] | |||
== Documentation Arduino ESP8266 == | |||
* [https://arduino-esp8266.readthedocs.io/en/2.5.0/ Arduino ESP8266 documentation] | |||
* [https://tttapa.github.io/ESP8266/Chap01%20-%20ESP8266.html Beginners guide to ESP8266] | |||
== Pinout overview == | |||
[[File:Esp12.png|frame|center|ESP8266-12 Arduino Pinout]] | |||
[[File:Esp12e-pinout.png|frame|center|ESP8266-12 Pinout]] | |||
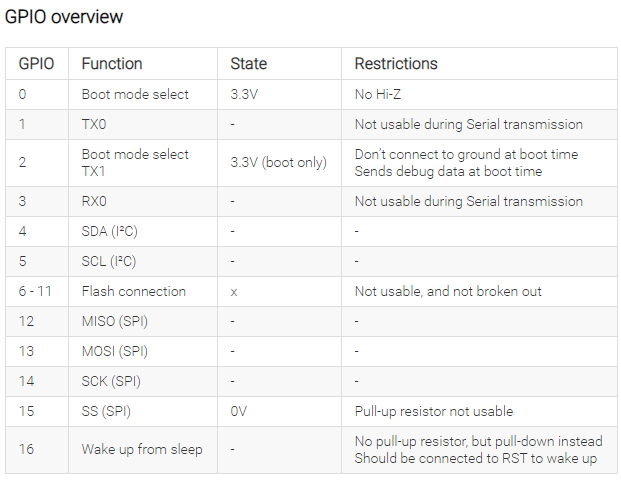
[[File:Esp8266-pin-overview.png|frame|center|Restrictions]] | |||
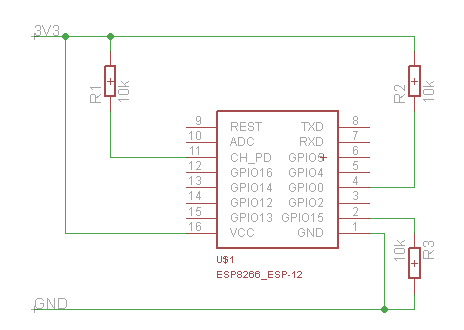
=== Esp minimal connection === | |||
[[File:ESP min.png|frame|center|ESP8266-12 Minimal connection]] | |||
==== Esp minimal connection mechanical ==== | |||
{| class="wikitable" | |||
! Design image | |||
! Implementation result | |||
! Thingiverse link | |||
|- | |||
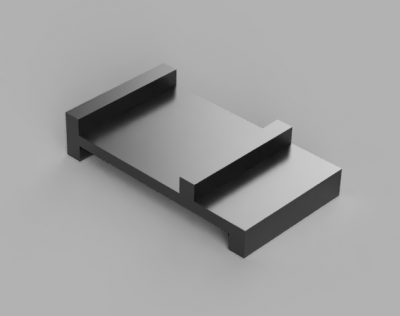
| [[File:Esp minimal mechanical jig.png|thumb|center|400px|Esp minimal mounting jig 3D printing]] | |||
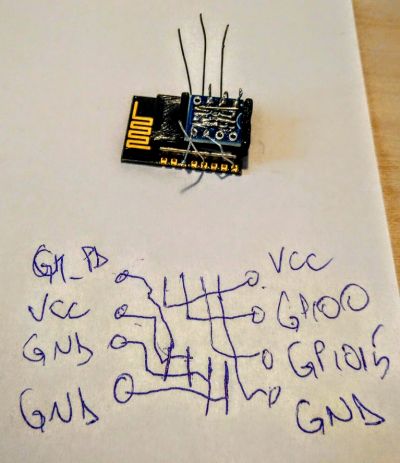
| [[File:Esp8266 real mounting jig.jpg|thumb|center|400px|Esp minimal mounting jig 3D printing]] | |||
| https://www.thingiverse.com/thing:3562829 | |||
|- | |||
| colspan="3" | To edit table: [[File:esp minimal mechanical jig.tng]] | |||
|} | |||
=== Pinout === | |||
{| class="wikitable" | |||
! Mapping | |||
! ADC | |||
! Serial | |||
! Pin | |||
! rowspan="9" | [[File:Esp12.png|center|ESP8266-12]] | |||
! Pin | |||
! Serial | |||
! Mapping | |||
|- | |||
| | |||
| | |||
| | |||
| RESET | |||
| D1 | |||
| TX0 | |||
| | |||
|- | |||
| | |||
| ADC | |||
| | |||
| ADC | |||
| D3 | |||
| RX0 | |||
| | |||
|- | |||
| | |||
| | |||
| | |||
| CHPD | |||
| D5 | |||
| SCL | |||
| | |||
|- | |||
| | |||
| | |||
| | |||
| D16 | |||
| D4 | |||
| SDA | |||
| | |||
|- | |||
| | |||
| | |||
| SCK | |||
| D14 | |||
| D0 | |||
| | |||
| | |||
|- | |||
| | |||
| | |||
| MISO | |||
| D12 | |||
| D2 | |||
| TX1 | |||
| | |||
|- | |||
| | |||
| | |||
| RX0* / MOSI | |||
| D13 | |||
| D15 | |||
| SS /TX0* | |||
| | |||
|- | |||
| 3V3 | |||
| | |||
| | |||
| VCC | |||
| GND | |||
| | |||
| GND | |||
|- | |||
| colspan="8" | To edit table: [[File:ESP8266-12.tgn]] | |||
|} | |||
[[Category:Controller modules]] | |||
Latest revision as of 08:18, 30 May 2021
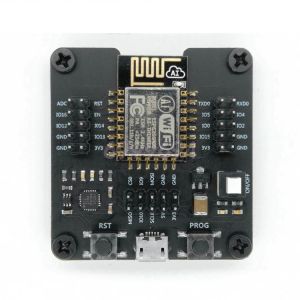
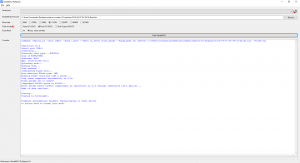
Flashing the ESP8266
- Download the NodeMCU PyFlasher [1]
- Download the ESPlorer [2]
- Download latest greatest NodeMCU build [3]
- Download latest build of PlatformIO [4]
- Download and install git [5]
Software
How to configure the OpenHAB Homie Thing
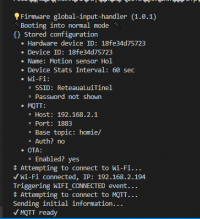
- Flash the base software to the esp8266: GitHub Homie test software repository
- Configure the details of the network in the data/homie/configuration.json file
- Upload the configuration file to the esp: How to upload the files to ESP8266
- Reboot
- Connect to the terminal and get the verbouse communication
- Identify the device ID
- Go to: OpenHAB Configuration Things and configure the thing using the ID above
Supported channel things are listed here: List of supported channels
Documentation Arduino ESP8266
Pinout overview
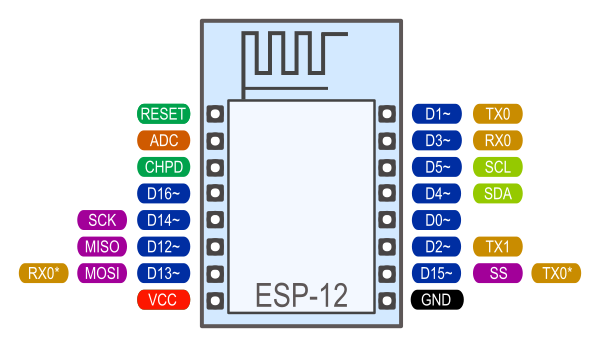

Esp minimal connection
Esp minimal connection mechanical
| Design image | Implementation result | Thingiverse link |
|---|---|---|
 |
 |
https://www.thingiverse.com/thing:3562829 |
| To edit table: File:Esp minimal mechanical jig.tng | ||
Pinout
| Mapping | ADC | Serial | Pin |  |
Pin | Serial | Mapping |
|---|---|---|---|---|---|---|---|
| RESET | D1 | TX0 | |||||
| ADC | ADC | D3 | RX0 | ||||
| CHPD | D5 | SCL | |||||
| D16 | D4 | SDA | |||||
| SCK | D14 | D0 | |||||
| MISO | D12 | D2 | TX1 | ||||
| RX0* / MOSI | D13 | D15 | SS /TX0* | ||||
| 3V3 | VCC | GND | GND | ||||
| To edit table: File:ESP8266-12.tgn | |||||||